Steam curls up from the valve and your stomach starts talking back. You spot the float valve rising, telling you the pressure's building inside. That smell you sense? It’s lemon, garlic, and all those good things mixing together.

You feel the sealing ring doing its job, locking in all that moisture and flavor like a little kitchen wizard. Your kitchen smells like one of those fancy bistros you always wanna visit but never do. The birds outside chirp but you pay no mind—this is your moment.
That quick release is gonna be your best friend when time’s tight. Pop it open, and bam, dinner’s almost ready. You remember the slow release you tried once, but tonight you’re all about speed with no compromise on taste.
Why Your Cooker Beats Every Other Pot
- It traps steam tight with a sealing ring so flavors get super intense.
- The float valve shows you when it’s time to step back or get cooking.
- Quick release lets you open it fast without waitin’ around forever.
- You don’t gotta watch the stove or stir constantly—it works while you chill.
- Natural release keeps things tender by lettin’ pressure fall slow and smooth.
- Cooks chicken juicy and soft, way better than oven drying it out.
- It’s a one-pot wonder so less mess to clean up at the end of the day.
Using a pressure cooker for this chicken piccata ensures tender, juicy meat while locking in flavors perfectly. If you want more great recipes with similar convenience, check out our Classic Crockpot Pierogi Casserole for an easy one-pot meal.
Everything You Need Lined Up
- 2 lbs boneless skinless chicken breasts—you want ‘em even sized so cook time’s right.
- 2 teaspoon kosher salt, just enough to bring out the chicken’s natural flavor.
- 1 teaspoon fresh cracked black pepper, ‘cause a little bite’s gotta be there.
- ½ cup cassava or all-purpose flour for that light dredge coating that gets golden.
- 2 tablespoon extra virgin olive oil and maybe some extra for searing without dry spots.
- 2 tablespoon butter or ghee, swap vegan butter if you’re keepin’ it dairy-free.
- 4 garlic cloves peeled and smashed so the flavor really bursts out.
- 1 ½ cups chicken broth, the base that keeps things juicy and saucy.
- 4 tablespoon freshly squeezed lemon juice—you want it fresh so that tart kick shines through.
- 2 tablespoon capers drained for that little briny pop that holds it all together.
- 2 tablespoon minced parsley to toss on top when you serve for color and fresh vibes.
Make sure all your ingredients are prepped and ready. For an easy shortcut, using pre-sliced chicken breasts can speed up your cooking process.
Your Complete Cooking Timeline
Start by seasoning the chicken breasts with the kosher salt and cracked black pepper. You gotta make sure every piece is evenly coated for best flavor.
Next, dredge each breast in your chosen flour, covering it just right without clumps. This gives the chicken that pretty golden crust after searing.
Heat your olive oil in a large skillet over medium heat. Sear the chicken breasts for 3 to 4 minutes each side till you see that golden brown color appear. Do this in batches if the pan’s crowded or you’ll steam them instead of sear.
Transfer the seared chicken over to the crockpot. It’s gonna soak up all the tasty juices in there.
Now, in the same skillet, melt your butter or ghee and add those smashed garlic cloves. Let ‘em sauté for about 1 to 2 minutes so the kitchen fills with that buttery garlic scent.
Pour in the chicken broth and freshly squeezed lemon juice. Scrape any browned bits stuck on the skillet bottom into the mix with a wooden spoon—that’s flavor gold. Pour this whole mixture over the chicken in the crockpot, then sprinkle the capers on top.
Cover and cook on low for 4 to 5 hours or on high for 2 to 3, depending how much time you got. When done, use a quick release carefully to open your cooker. Serve with the sauce spooned over the chicken and garnish with parsley if you want.
Smart Shortcuts for Busy Days
- Use pre-sliced chicken breasts from the store to skip cutting yourself.
- Grab minced garlic from a jar if peeling cloves sounds like too much work today.
- Buy fresh lemon juice in bottles for days when you forget lemons at the store.
- Prepare the sauce in the skillet ahead and freeze it, then just add to crockpot with chicken later.
- Make a double batch and freeze leftovers so you got lunch covered next week.
That First Bite Moment
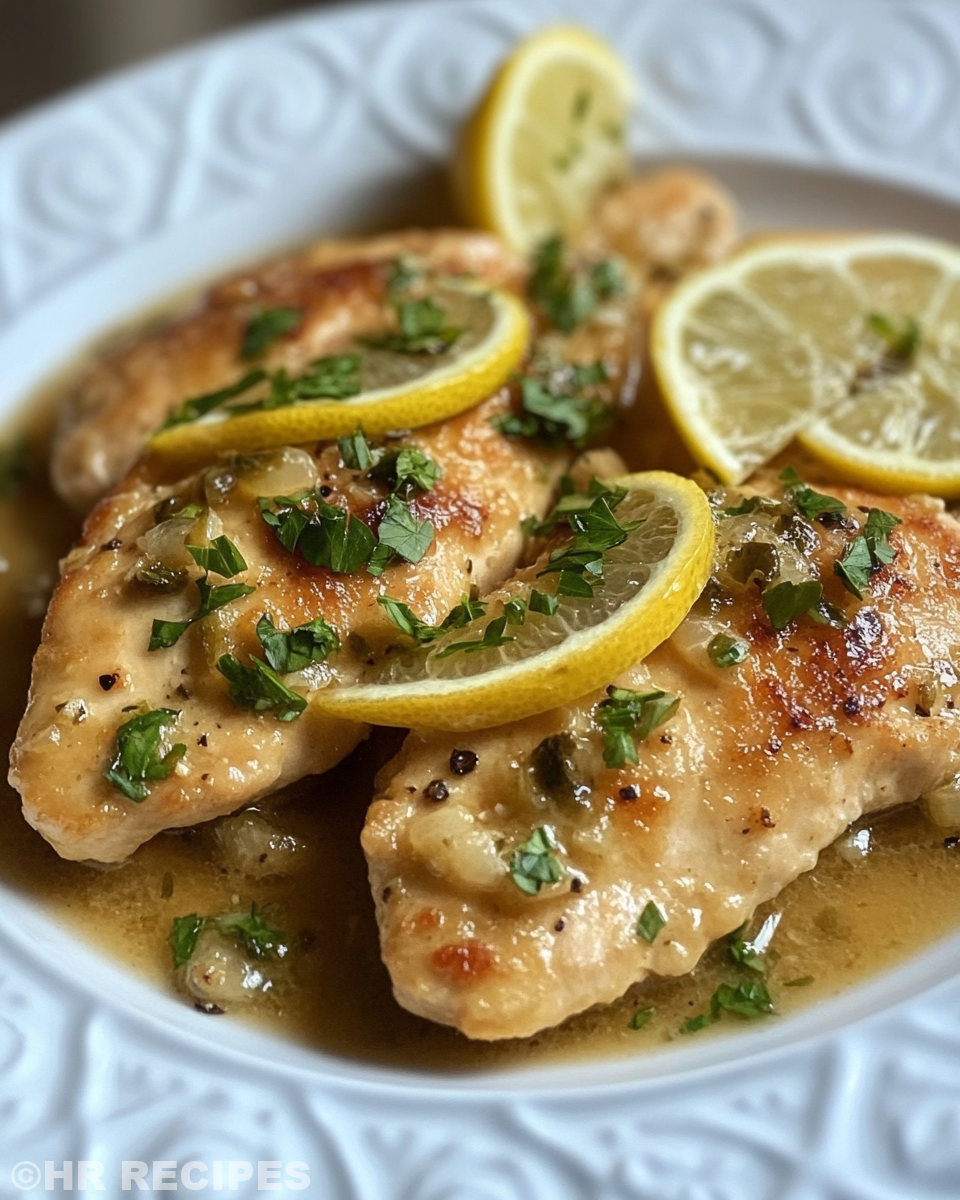
You pick up your fork and the chicken feels so tender it almost falls apart. The sauce glistens with lemon brightness and those little capers give a burst of salty tang that changes the whole dish.
When you taste it, the garlic butter flavor hits your tongue first, smooth and rich. Then you get the lemon’s fresh zing swirling around. It’s like eating sunshine with a soft chicken hug.
The parsley on top gives you a fresh green snap that cuts through the richness just right. You close your eyes briefly and tell yourself you gotta make this again real soon.

Your Leftover Strategy Guide
Store any extra chicken and sauce in an airtight container in the fridge. It’s gonna keep good for about 3 to 4 days, which is perfect for quick lunches.
If you wanna hold on longer, freeze leftovers in a freezer-safe dish or zip-top bag. Label it so you remember what’s inside. It should keep well for up to 3 months.
When reheating, do it gently in the microwave or on the stove so the chicken stays juicy and doesn’t dry out. Adding a splash of broth or water helps loosen the sauce back up.
You can also shred the leftover chicken and toss it in salads, wraps, or pasta for a fresh meal remix after a day or two.
What People Always Ask Me
- Can I use chicken thighs instead of breasts? Yes, you can. Thighs stay juicy and give a deeper flavor but might need a bit longer cook time.
- Do I have to sear the chicken first? It’s not absolutely required but searing really ups that flavor and texture. Worth the extra step!
- What if I don’t have lemon juice? Squeeze fresh limes instead or add a splash of white wine vinegar for a similar brightness.
- Why does my chicken sometimes turn out tough? Could be ‘cause of quick release too soon or overcooking. Use natural release or slow release sometimes to keep it tender.
- Can I skip the capers? Sure, but the capers add that salty zing that lifts the whole dish. Try adding green olives chopped if you want a substitute.
- How do I clean my pressure cooker after? Remove the sealing ring and wash it separately. Wipe down the lid and float valve. Make sure everything is dry before putting it back so you keep your cooker working great.
For related recipes, don’t miss our Classic Crockpot Pierogi Casserole with Kielbasa, a hearty dish that’s equally easy to make, or try the Mozzarella Stuffed Rosemary Parmesan Soft Pretzels for a savory snack. Also, the Easy Marinated Cheese Appetizer with Salami & Green Olives makes a great appetizer to pair with your meals.

Crockpot Chicken Piccata: Pressure Cooker Comfort in a Snap
Equipment
- 1 Mixing bowl Large
Ingredients
Main ingredients
- 2 lbs Boneless skinless chicken breasts even sized
- 2 teaspoon Kosher salt
- 1 teaspoon Fresh cracked black pepper
- 0.5 cup Cassava or all-purpose flour
- 2 tablespoon Extra virgin olive oil plus more as needed
- 2 tablespoon Butter or ghee sub vegan butter for dairy-free option
- 4 cloves Garlic peeled and smashed
- 1.5 cups Chicken broth
- 4 tablespoon Freshly squeezed lemon juice about 2 large lemons
- 2 tablespoon Capers drained
- 2 tablespoon Parsley minced for garnish
Instructions
Instructions
- Season chicken breasts with kosher salt and black pepper.
- Dredge each breast in flour until evenly coated.
- Heat olive oil in skillet and sear chicken 3-4 minutes per side until golden brown.
- Transfer seared chicken into the crockpot.
- Melt butter in skillet, add garlic, and sauté 1-2 minutes.
- Pour in chicken broth and lemon juice, scraping browned bits from pan. Simmer sauce for 3-4 minutes.
- Stir in capers, then pour sauce over chicken in crockpot.
- Cover and cook on low 4–6 hours or high 2–3 hours.
- Serve with sauce and garnish with parsley.