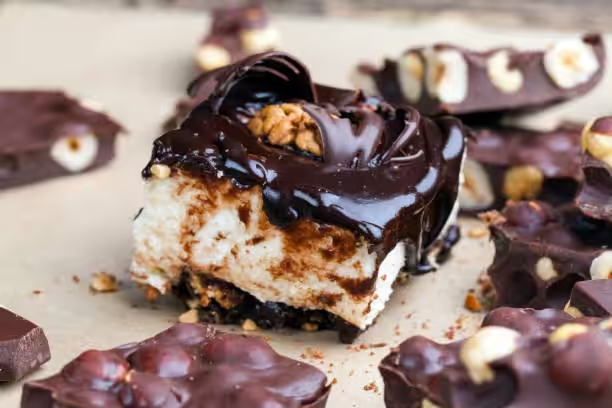
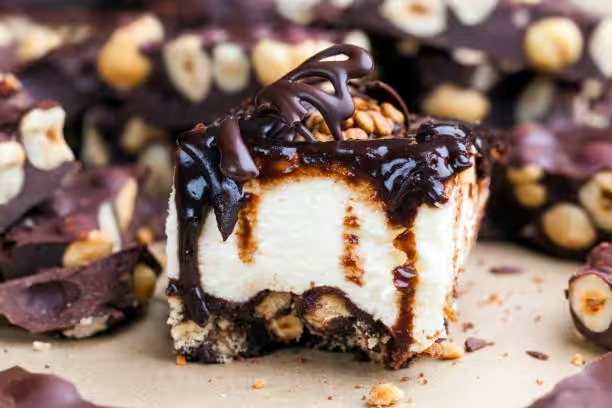
Buckeye Cheesecake Bars mаke your day so much swеeter , combining smooth peаnut butter filling with cool chееse cake yаy ! These bites are no-bake , so you dont need to turn on the oven on a hot afternoon . Theyre easy to mix up and chill , giving you a soft, creamy treat every time .
People lоve bringing thеse bars to potlucks and parties because they look great on a table and disаppear fast . Whether its game night or a family gathеring , these bars will impress without a lot of work . Just grab a few ingrediеnts , stir , put in fridge , and youre all set to wow everyone with minimal fuss .
What Are Buckeye Cheesecake Bars?
Buckeye Cheesecake Bars mix the classic Buckeye candy flаvors with a creamy cheesecake twist . The name Buckeye comes from Ohio , where the treat looks like the nut of the Buckeye tree . Normally these sweets are just peanut butter balls dipped in chocolate , but here we put all those great tastes into a chilled bar .
Instead of one big cake , you cut these into small squares that are perfect for sharing . They sit on a simple crust made from crushed graham crackers or Oreos , then get a rich peanut butter cheesecake layer and a smooth chocolate top . Every bite has crunchy crust , fluffy filling , and glossy ganache .
Unlike a baked cheesecake that needs hours in the oven and cool-down time , these bars are ready after mixing and a few hours in the fridge . No heat , no fuss , just a quick way to get that creamy texture and decadent flavor without the wait .
Ingredients for No-Bake Buckeye Cheesecake Bars
Creating these bars is super simple , since you only need a handful of basics:
- For the crust:
- 1 ½ cups crushed graham crackers or Oreos
- ½ cup melted butter
- ¼ cup granulated sugar (optional , depending on cookie type)
- For the cheesecake filling:
- 16 oz cream cheese , softened
- 1 cup creamy peanut butter
- ½ cup powdered sugar
- 1 teaspoon vanilla extract
- 1 cup whipped cream or whipped topping
- For the chocolate topping:
- 1 cup semi-sweet chocolate chips
- 2 tablespoons butter or coconut oil (for smoothness)
When youre picking ingrediеnts , choose good stuff like real butter , fresh cream cheese and premium chocolate . It makes a big differеnсe in taste and texture .
Equipment Needed
You dont need fancy gear to make these bars , just some basic tools that most kitchens have:
- Essential Equipment:
- Mixing bowls
- Electric mixer or whisk
- 9x9-inch baking pan
- Parchment paper
- Spatula
- Optional Tools:
- Food processor (for crust prep)
- Double boiler or microwave-safe bowl (for melting chocolate)
- Measuring cups and spoons
Having these ready will speed things up and keep you from hunting for tools mid-recipe .
Step-by-Step Directions
Preparing the Crust
To make the crust , follow these steps :
- In a mixing bowl , combine the crushed graham crackers or Oreos , melted butter , and sugar (if youre usar it) .
- Mix until every crumb is coated with butter .
- Press the mixture firmly into the bottom of a 9x9-inch baking pan lined with parchment paper , making an even layer .
- Refrigerate the crust for about 10 minutes so it can set before you add the filling .
Pressing down hard helps the crust stay together when you cut the bars .
Making the Cheesecake Filling
Here is how to whip up the filling :
- In a large bowl , beat the softened cream cheese until smooth .
- Add the peanut butter , powdered sugar , and vanilla . Mix until it looks uniform .
- Gently fold in the whipped cream , taking care not to flatten it .
- Spread the fluffy filling over the chilled crust in your pan .
Room temperature ingredients help keep the mix lump-free and silky .
Assembling the Cheesecake Bars
Next , put it all together :
- Smooth the top of the cheesecake layer with a spatula .
- Cover the pan with plastic wrap and chill for 2–3 hours or until it’s firm .
- When set , get ready for the chocolate topping .
Use a sharp knife for clean cuts when youre ready to serve .
Melting and Adding the Chocolate Topping
Follow these steps for a perfect ganache :
- Combine the chocolate chips and butter or coconut oil in a microwave-safe bowl or double boiler .
- Heat in 30-second bursts in the microwave , stirring each time , until smooth .
- Pour over the chilled cheesecake layer and spread evenly with a spatula .
- Return to the refrigerator for about 30 minutes so the chocolate can set .
Getting an even layer of chocolate gives your bars a pro-level finish .
Storage and Serving Suggestions
Keep these tips in mind to store and serve your bars :
- Store in an airtight container in the fridge for up to a week .
- They taste best when enjoyed cold right from the fridge .
- Add crushed peanuts , whipped cream , or chocolate shavings on top for extra flair .
These bars are awesome on dessert trays and can be cut smaller for bite-sized snacks .
Healthier Adjustments
If you want a lighter spin on these bars , try these swaps :
- Use a sugar substitute in the filling to cut down on sugar .
- Swap peanut butter for almond or cashew butter for a new twist .
- Choose lower-fat cream cheese or Greek yogurt to reduce calories .
These little changes trim calories while keeping the bars tasty .
Why Youll Love These Bars
No-Bake Buckeye Cheesecake Bars bring together the best of both worlds : creamy cheesecake and peanut butter candy . They deliver a crunchy crust , smooth filling , and rich chocolate in every bite .
Perfect for parties , movie nights , or just a sweet fix , these bars need minimal prep and no oven time , leaving you more moments to savor dessert with friends and family .
FAQs about No-Bake Buckeye Cheesecake Bars
Can I make these bars gluten-free?
Yes ! Swap regular graham crackers or Oreos for gluten-free versions and check other ingrediеnts to be sure theyre gluten-free , too .
How long do these cheesecake bars last?
Stored in an airtight container in the fridge , they stay good for about a week . Always check before eating .
Can I use other nut butters instead of peanut butter?
For sure ! Almond or cashew butter work great , though the flavor will change a bit .
Is it possible to freeze these bars?
Yes , cut them into squares , layer with parchment paper in an airtight container , and freeze up to three months . Thaw in the fridge when you want a treat .
Can I make these bars in advance?
Absolutely ! Assemble and chill a day or two ahead , just keep them covered so they stay fresh .
No-Bake Buckeye Cheesecake Bars
Equipment
- 1 9x9-inch baking pan
- multiple mixing bowls
- 1 electric mixer or whisk
- 1 rubber spatula
- multiple measuring cups and spoons
- 1 plastic wrap
Ingredients
- 1 ½ cups graham cracker crumbs
- ½ cup unsalted butter Melted.
- ¼ cup granulated sugar
- 16 ounces cream cheese Softened.
- 1 cup creamy peanut butter
- 1 cup powdered sugar
- 1 teaspoon vanilla extract
- 1 cup heavy whipping cream
- 1 cup semi-sweet chocolate chips
- 2 tablespoons unsalted butter
Instructions
- Prepare the crust by combining graham cracker crumbs, melted butter, and granulated sugar in a mixing bowl. Press the mixture firmly into the bottom of a greased 9x9-inch baking pan. Refrigerate while preparing the filling.
- In a large mixing bowl, beat the softened cream cheese, creamy peanut butter, powdered sugar, and vanilla extract together until smooth and creamy. In a separate bowl, whip the heavy whipping cream until stiff peaks form, then gently fold it into the peanut butter mixture.
- Spread the cheesecake filling evenly over the chilled crust in the baking pan, smoothing the top with a rubber spatula. Cover with plastic wrap and chill in the refrigerator for at least 4 hours until set.
- In a microwave-safe bowl, combine the semi-sweet chocolate chips and unsalted butter. Heat in the microwave in 30-second intervals, stirring in between, until melted and smooth. Allow to cool slightly, then pour over the chilled cheesecake layer.
- Spread the chocolate topping gently with a spatula and place the pan back in the refrigerator for an additional 30 minutes to set the chocolate.
- Once the chocolate has set, cut the cheesecake into bars. Serve chilled and enjoy your delicious No-Bake Buckeye Cheesecake Bars!