
That first hiss from the cooker tells you something good is happening. You know that pressure building up inside gonna turn out something warm and tasty real quick. It�27s kinda neat how just that sound already makes you feel closer to the kitchen magic �2D well, I mean, the baking magic but you get it.
When you�27re making these Eggnog Snickerdoodle Cookies, you feel the anticipation grow. The sealing ring fits tight, and the float valve�27s set, so you just wait. It�27s like this promise that soon, you�27ll smell cinnamon and nutmeg filling the air.
Pressure cookers and cookies might sound funny together, but trust me, it works real good. You don�27t always need to wait forever for your treats, and pressure cooking keeps it kinda simple and unexpected. You remember the days waiting on dough to chill or cookies baking forever? Forget that now.
The Real Reasons You Will Love This Method
- Pressure cookers save you time totally by speeding up the baking process.
- The broth depth inside the cooker adds moist heat that keeps cookies soft.
- You get even cooking without worrying about burning edges.
- The natural release lets cookies finish gently, so they�27re perfectly tender.
- Using a slow release method helps prevent cookie collapse, making �91em just right.
- With the sealing ring and float valve in action, you get consistent results every time.
The Complete Shopping Rundown
You gonna need some basics first. Grab a full cup of unsalted butter that�27s softened to room temperature. Next, you want one cup of granulated sugar plus half a cup of light brown sugar to mix that sweetness up right.
Don�27t forget a large egg and one and a half teaspoons vanilla extract for that good vanilla vibe. Salt is essential too, just half a teaspoon, plus one teaspoon cinnamon and half a teaspoon nutmeg for the cozy flavor blast.
On the rising agents side, pick up two teaspoons of baking powder and a teaspoon cream of tartar. For the flour, you want three cups all-purpose to make that dough come together. And yep, this recipe calls for a quarter cup eggnog for that holiday twist.
For rolling your dough balls, get a third cup granulated sugar, a quarter teaspoon nutmeg, and three quarters teaspoon cinnamon mixed up for the cinnamon-sugar coating.
Walking Through Every Single Move
Step one, you preheat the oven to 350 degrees Fahrenheit and line your baking sheet with parchment paper. This gives you a smooth surface to work with later.
Now, mix up that butter with granulated and brown sugar in a big bowl until it�27s light and fluffy. You gotta be patient here because this step really builds your cookie texture.
Beat in the egg and vanilla next, making sure everything�27s well combined. That�27s the start of your tasty base.
In another bowl, whisk together the salt, cinnamon, nutmeg, baking powder, and cream of tartar. This dry mixture is what makes these cookies pop with flavor and rise just right.
Gradually add those dry ingredients into the wet ones, mixing until soft dough forms. Here�27s where your hands could come in handy if you like getting a bit messy.
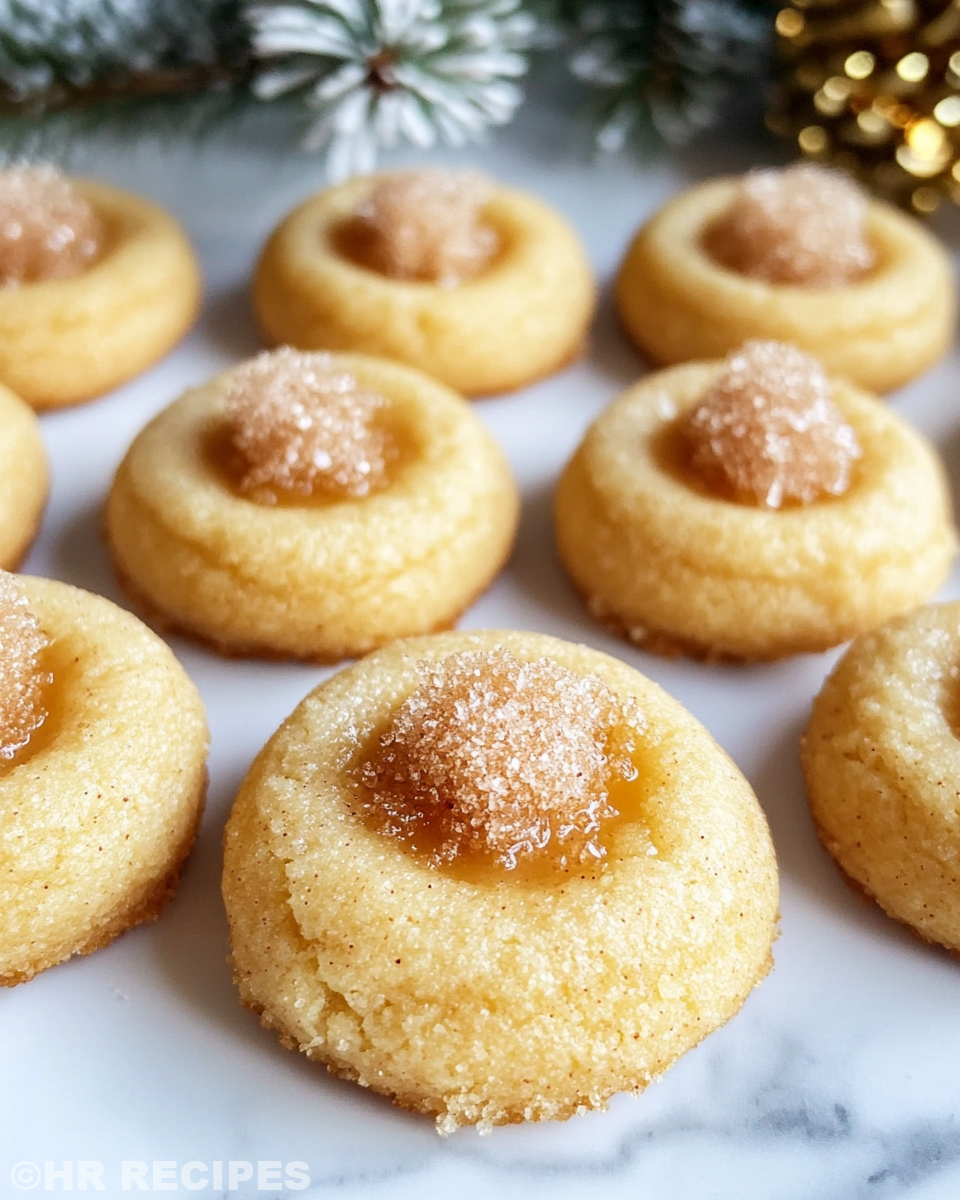
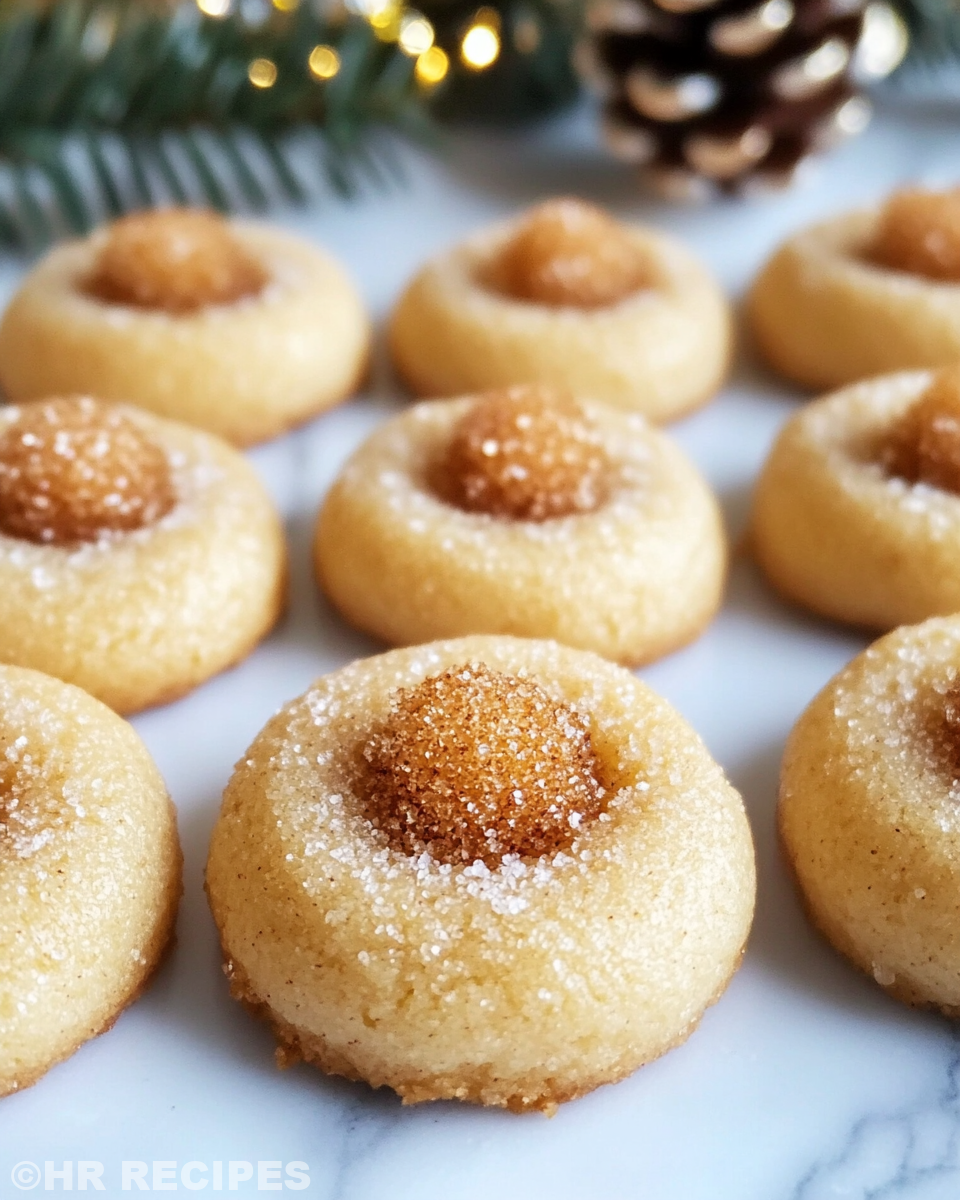
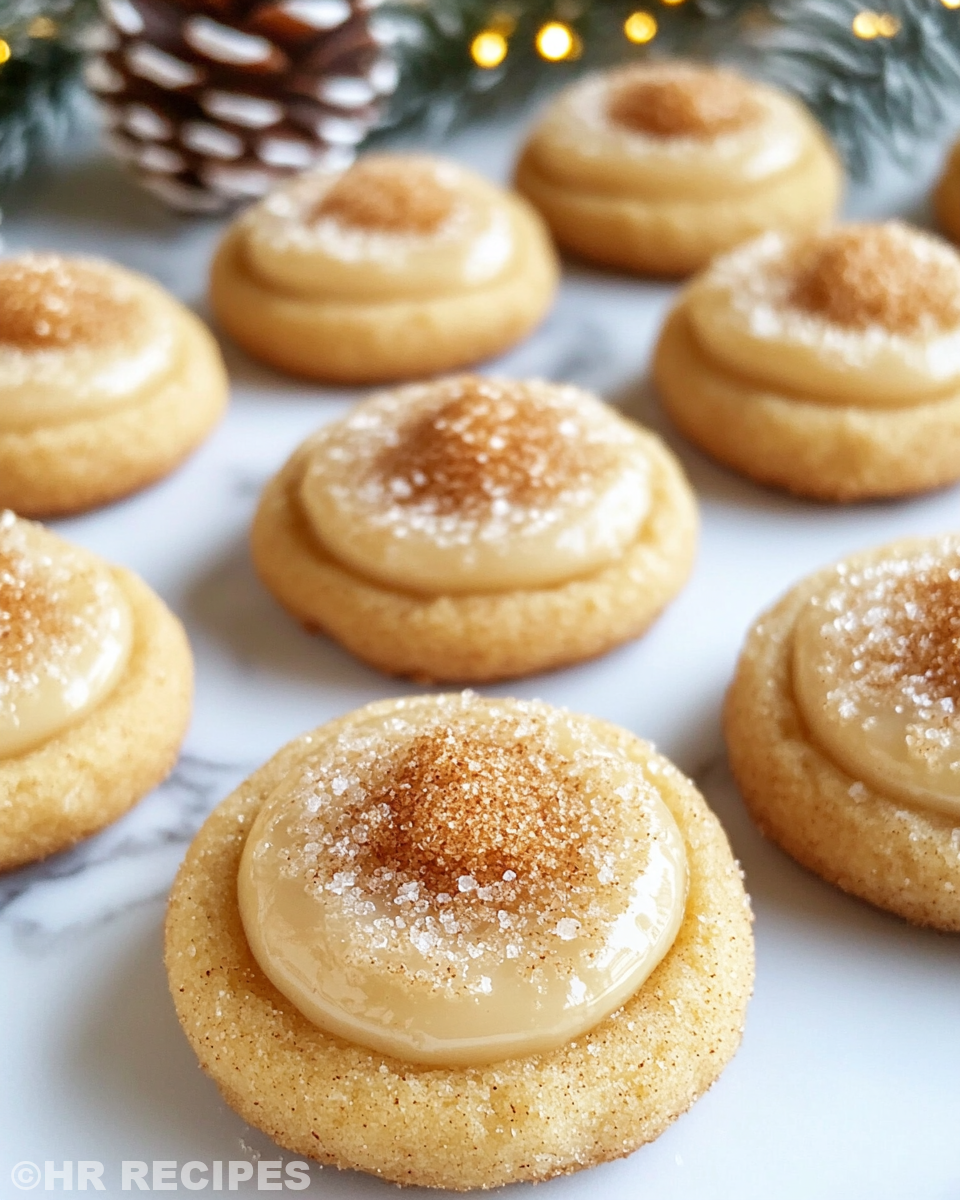
Scoop tablespoon-sized dough balls and roll �91em up tight. Then roll each in that cinnamon-sugar mix if you want some extra zing. Place �91em on your baking sheet about two inches apart�20�97 cookies need their space to grow.
Press your thumb or back of a spoon into the center of each ball to make a little indentation. This helps the cookies bake up evenly and give you that classic snickerdoodle look.
Bake those babies for about 10 to 12 minutes till the edges start turning lightly golden. Take them out and let cool on the baking sheet for five before moving to a wire rack to cool all the way.
Quick Tricks That Save Your Time
- Make sure the sealing ring on your pressure cooker is snug so no steam escapes and cooking goes smooth.
- Pre-measure your spices and sugars in little bowls, makes mixing way quicker.
- Use the slow release method to avoid overcooking while you tidy up your kitchen.
- Line multiple baking sheets with parchment ahead of time if you�27re planning a cookie batch marathon.
- If you�27re short on time, chill the dough for just 15 minutes instead of longer�20�97�20it still works pretty good.
The Flavor Experience Waiting for You
Each bite of these Eggnog Snickerdoodle Cookies wraps you in the warm hug of cinnamon and nutmeg. The spices aren�27t too strong but strike just the right balance with the sweet sugar coating.
The eggnog adds a subtle creamy twist that kinda sets these cookies apart from your usual snickerdoodle. You sort of sense a rich, festive vibe without it being too much.
The soft texture with just a tiny crisp on the edges makes them super satisfying to chew. Pressure cooking helps keep the moisture inside, so your cookies won�27t feel dry or crumbly.
You feel the vanilla and butter melting together on your tongue, making these cookies feel like a cozy winter treat made just for you.
Smart Storage That Actually Works
Once your cookies are fully cooled, store them in an airtight container. This keeps �91em fresh and prevents getting stale or too soft from air exposure.
If you want longer storage, you can freeze the cookies in a sealed bag or container. Just thaw them at room temp, and they�27re ready to enjoy like fresh.
For quick grabs, keep a small batch in a cookie jar on the counter but use them up within a couple days for best flavor and texture.
The FAQ Section You Actually Need
- Can I skip the eggnog? Yeah, you can swap with milk or a little cream if you want, but eggnog gives these cookies their special flare.
- Will the pressure cooker mess up my cookie shape? Not if you use the indentation trick and space them out properly on the baking sheet before baking in the oven after pressure cooking moisture sets.
- How does the sealing ring affect baking? The sealing ring keeps pressure steady inside, which helps with even cooking and good moisture levels.
- What does the float valve do here? It signals when your cooker is pressurized so you know when cooking starts for real.
- Why use slow release instead of natural release? Slow release helps reduce sudden pressure drops that could cause cookies to deflate or crack.
- How long can I keep these cookies stored? Use airtight storage and eat up within a week if kept at room temp or freeze if you need longer life.
For related recipes, check out our Cheesy Kielbasa Hashbrown Casserole Dump Meal Recipe for a quick and easy option using kielbasa, or explore Mozzarella Stuffed Rosemary Parmesan Soft Pretzels featuring cheesy, herbed treats perfect for snacks. Also, don�27t miss our Easy Marinated Cheese Appetizer with Salami & Green Olives as a savory delight to complement your meals.
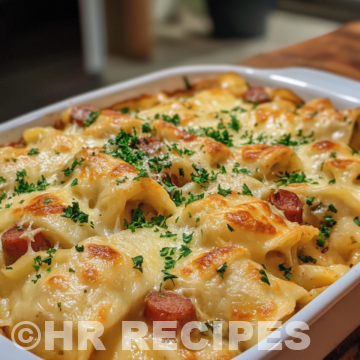
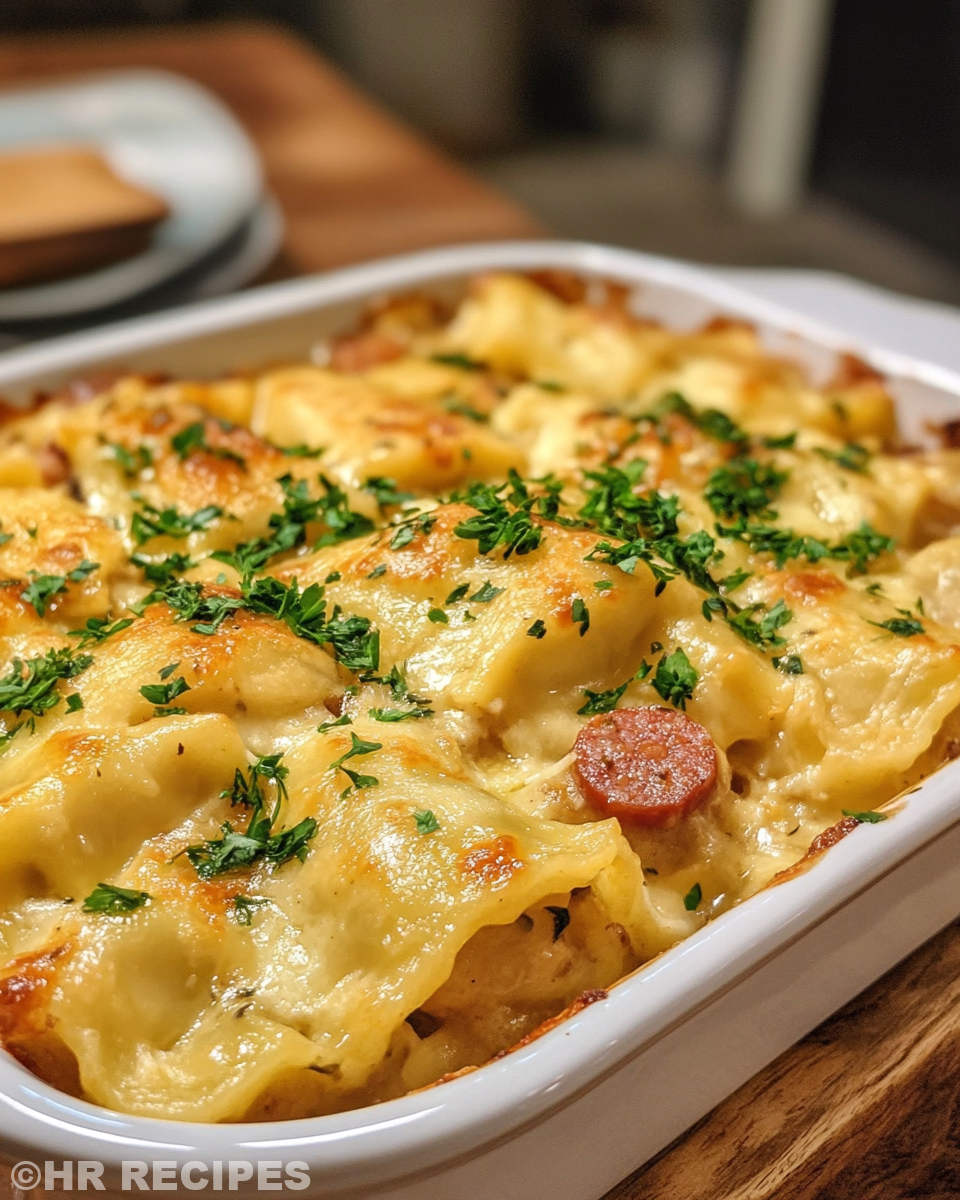
Slow Cooker Pierogi Kielbasa Casserole Recipe
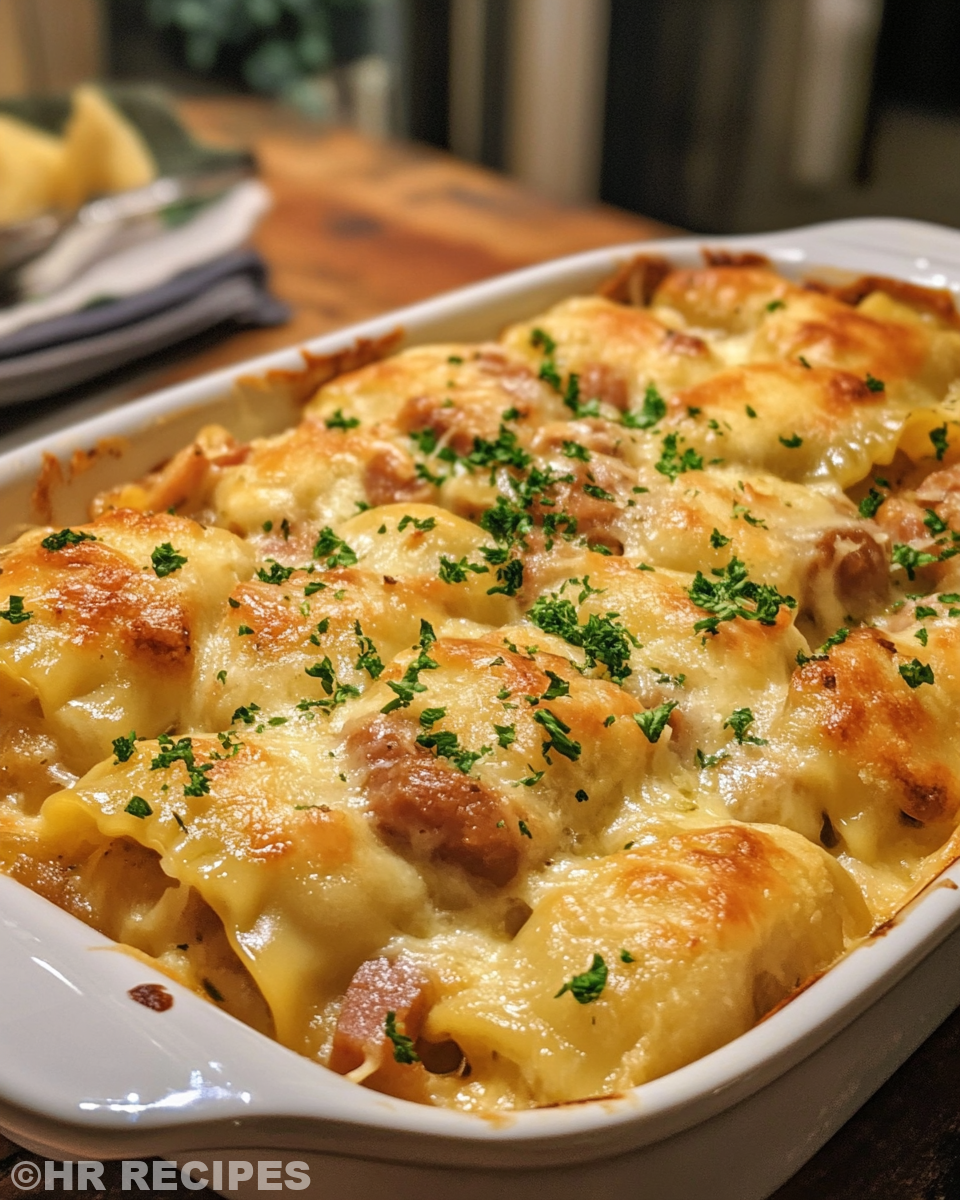
First, spray your slow cooker inside with that non-stick cooking spray. You don�27t wanna have a sticky situation later, trust me.
Next, layer your frozen pierogies at the bottom evenly. Don�27t stir �91em, just lay �91em flat so they cook nice and tender.
Then add your sliced kielbasa on top of that layer. Now, sprinkle salt and pepper over the top according to your taste buds. Don�27t be shy here.
In a separate bowl, whisk together the chicken broth and cream cheese until things look mostly smooth. It�27s okay if a few lumps hang around, they�27ll melt soon enough.
Pour that creamy broth mixture right over the pierogies and kielbasa. Cover the slow cooker and set it on low for 4 to 5 hours or high for 2 to 3 hours. You�27re lookin�27 for everything heated through and bubbly.
During the last 15 minutes, sprinkle shredded cheddar cheese all over the top and cover again to let it melt nice and gooey. When it�27s done, give everything a gentle stir before serving up. That�27s where the tender pull shows up best.
Easy Tweaks That Make Life Simple
- You can swap cream cheese for sour cream if you want a little tang.
- Opt for smoked turkey kielbasa for a lighter twist but just as much flavor.
- Freeze any leftovers in individual portions so you can just steam reheat without drying out.
- Use pre-shredded cheese to skip grating, it works real good.
- If you�27re short on time, throw it on high for 2 �bd hours and just watch the cooker for those steam cues closely.
The Flavor Experience Waiting for You
This casserole hits just the right notes of creamy, cheesy goodness swirled deep with the savory punch of kielbasa. You never get bored �91cause each bite�27s got little surprises.
The broth depth from chicken stock and cream cheese kind of wraps everything in a comforting blanket, making it rich but not heavy. It�27s like the flavors all got cozy and wouldn�27t leave anytime soon.
When that cheddar cheese melts on top at the end, it�27s the cherry on top �E2�80� gooey, stretchy, and downright irresistible. When you dig in, you feel that warm, tender pull and know you�27re exactly where you wanna be.
Making It Last All Week Long
Store leftovers in an airtight container in the fridge for up to 4 days. Just reheat gently on the stove or in the microwave and get ready for round two.
For longer storage, freeze portions in freezer-safe bags. When you want a meal, thaw overnight in the fridge then heat gently, watching those steam cues.
If you got a pressure cooker, you can do a quick release reheat with a little splash of broth to keep things moist. Just add your frozen portions, seal, and cook on low for 5 minutes.
Common Questions and Real Answers
Q: Can I use fresh pierogies instead of frozen?
Your fresh pierogies will cook faster so keep an eye on the timing, maybe cut the cook time down a bit to avoid mush.
Q: What if I don�27t have cream cheese?
You can swap it with sour cream or full-fat Greek yogurt, but it might change the thickness of your broth.
Q: Is this recipe safe to adapt for a pressure cooker?
Definitely! You gotta watch the natural release so pierogies stay tender and not mushy. Quick release works too if you�27re short on time but be gentle.
Q: Can I add veggies to this casserole?
Sure thing! Add diced onions, peppers, or mushrooms on top with the kielbasa to cook through well.
Q: How salty should the broth be?
Since kielbasa and cheese pack a punch, keep salt moderate and taste test before serving.
Q: What cheeses work besides cheddar?
Monterey Jack, Colby, or a mild mozzarella gives a nice melty texture but cheddar gives that classic kick you�27re used to.
For related recipes, check out our Cheesy Kielbasa Hashbrown Casserole Dump Meal Recipe for a quick and easy option using kielbasa, or explore Mozzarella Stuffed Rosemary Parmesan Soft Pretzels featuring cheesy, herbed treats perfect for snacks. Also, don�27t miss our Easy Marinated Cheese Appetizer with Salami & Green Olives as a savory delight to complement your meals.

Eggnog Snickerdoodle Cookies Done Pressure Cooker Style
Equipment
- 1 Stand Mixer
- 1 Small Cookie Scoop
Ingredients
Cookie Ingredients
- 1 C unsalted butter softened
- 1 C granulated sugar
- ½ C light brown sugar
- 1 large egg
- 1 ½ teaspoon vanilla extract
- ½ teaspoon salt
- 1 teaspoon cinnamon
- ½ teaspoon nutmeg
- 2 teaspoon baking powder
- 1 teaspoon cream of tartar
- 3 C all purpose flour
- ¼ C eggnog
- ⅓ C granulated sugar for topping
- ¼ teaspoon nutmeg for topping
- ¾ teaspoon cinnamon for topping
Instructions
Directions
- In a large bowl or stand mixer, cream together butter and sugars. Beat until light and fluffy.
- Mix in egg, followed by vanilla. Scrape bowl as needed.
- Mix in salt, spices, baking powder and cream of tartar.
- Add one cup of flour at a time, increasing speed after each addition.
- Slowly add in eggnog, mixing until just combined and no streaks remain.
- Chill dough for 1-2 hours or until dough is firm but manageable.
- Preheat oven to 350°F. Line a baking sheet with a silicone mat or parchment paper.
- In a small bowl, combine sugar, nutmeg and cinnamon for topping.
- Using a small cookie scoop, scoop slightly heaping balls of dough. Shape into smooth 1-inch balls. Roll each in sugar mixture and space 2 inches apart on baking sheet.
- Bake for 12-14 minutes. Cool on baking sheet for 5 minutes, then transfer to wire rack to cool completely.


