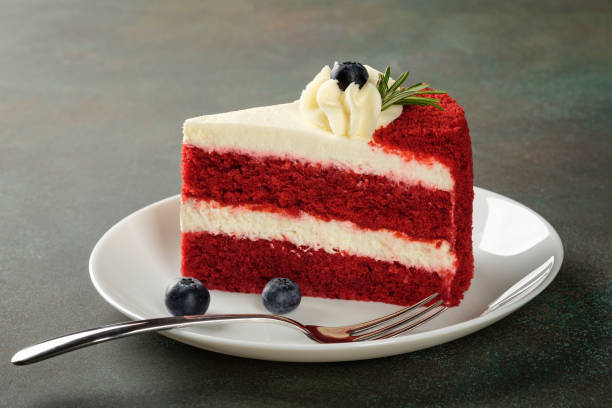
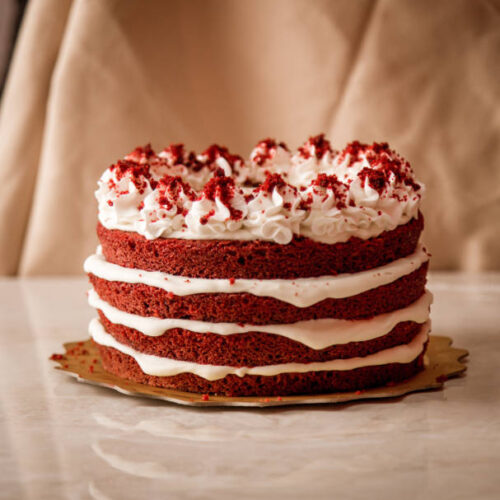
Red velvet саke has been around for a long time . It looks bright red , and it taste a bit like chocolate . It dont need much fancy stuff but it still steals the show at any party . This sweet treat came from the Southern United States where people used cocoa and buttermilk to make a soft cake . As years passed , it became a sign of indulgence and joy at weddings and valentines .
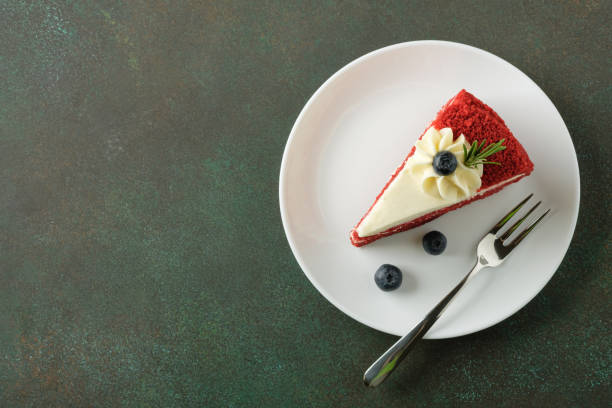
The red hue is not just show . It hides a gentle chocolate taste and a tang from buttermilk that makes it real nice . The classic version is layered with cream cheese frosting and that adds a hint of savory to the sweet . Lately , folks are baking it as cupcakes or cookies so everyone can enjoy a piece with less fuss .
Here we will dig into everything about red velvet саke . From its old history and how it changed , to a simple recipe , tips , and other ways to bake it . Even if you never bake before , you can follow along and make your own red velvet treat .
1. Understanding Red Velvet Cake
1.1 What is Red Velvet Cake?
Red velvet саke is a soft dessert with a bright red color and a mild chocolate flavor . It stay moist because of buttermilk and oil . The slight tang from the buttermilk go well with cocoa powder , giving a balance that taste good and look cool . People usually spread cream cheese frosting between the layers for more flavor .
1.2 The History of Red Velvet Cake
The cake started down in the South of the United States . At first , bakers mixed cocoa , buttermilk and vinegar and it made a dark red look naturally . Later on , they added red food coloring so the red got stronger . By the 1920s and 30s , a popular cookbook printed a recipe and boom , everybody wanted a slice . Since then , it held a spot at weddings , anniversaries , and Valentine 's Day .
1.3 Key Ingredients
- Cocoa powder: Gives the cake its mild choc taste .
- Red food coloring: Makes that bold red stand out as a festive treat .
- Buttermilk: Keeps the cake soft and adds a bit of tang .
2. Why Red Velvet Cake is so Popular
2.1 Visual Appeal
The bright red color next to white frosting makes it a show stopper . Desserts are not just about taste , they also need to look good . Red velvet cake nails both taste and looks .
2.2 Flavor Profile
It combines a faint chocolate note with a sweet tang from buttermilk . This combo makes it popular from kids to grownups who dont like desserts too sweet .
2.3 Cultural Significance
Red velvet cake is tied to special events and love . It show up at weddings , anniversaries , and Valentines Day to mark happy moments .
3. Classic Red Velvet Cake Recipe
3.1 Ingredients List
- Flour: 2 ½ cups
- Sugar: 1 ½ cups
- Cocoa powder: 1 tbsp
- Baking soda: 1 tsp
- Salt: 1 tsp
- Vegetable oil: 1 ½ cups
- Buttermilk: 1 cup
- Eggs: 2 large
- Red food coloring: 2 tbsp
- Vanilla extract: 1 tsp
- Vinegar: 1 tsp
3.2 Directions
- Preparation:
- Preheat your oven to 350°F (175°C) .
- Grease and flour two 9-inch round cake pans .
- Mix Dry Ingredients:
In a big bowl , sift together flour , cocoa powder , baking soda , and salt .
- Combine Wet Ingredients:
In another bowl , beat oil , sugar , buttermilk , eggs , food coloring , and vanilla until almost smooth .
- Combine Mixtures:
Slowly add the dry mix to the wet mix , stir just until you dont see flour streaks .
- Add Vinegar:
Quickly stir in the vinegar but dont overmix .
- Bake:
Pour batter evenly into pans . Bake 25–30 minutes , or until a toothpick comes out clean .
- Cool:
Let cakes cool in pans for 10 minutes , then move to racks to cool fully .
3.3 Frosting Options
- Classic Cream Cheese Frosting:
A rich and tangy icing that works perfect with the cake .
- Whipped Cream or Buttercream:
Use for a lighter or sweeter finish , your call .
3.4 Pro Tips for Baking the Perfect Red Velvet Cake
- Importance of Accurate Measuring:
Measure all ingredients right , its key to make the cake turn out good .
- Baking at Room Temperature:
Use room temp eggs and buttermilk so cake bake evenly .
- Using Fresh Ingredients:
Fresh supplies = better flavor and texture .
4. Variations of Red Velvet Cake
4.1 Red Velvet Cupcakes
Red velvet cupcakes are a fun twist on the full size cake . Bake in muffin tins for about 18–20 minutes and top with cream cheese frosting for a perfect snack .
4.2 Red Velvet Cookies
You can also shape the batter into cookies for a chewy , decadent treat . Just dont mix too much or they come out tough .
4.3 Gluten-Free and Vegan Options
- Gluten-Free: Swap regular flour for a gluten-free blend and double check all labels .
- Vegan: Use plant milks and flax eggs instead of dairy and eggs to mimic the texture .
5. Common Mistakes to Avoid
5.1 Overmixing the Batter
Mixing too much makes the cake dense and heavy . Stop when you see the ingredients just come together .
5.2 Not Using Enough Food Coloring
Too little coloring and the cake look brown more than red . Follow the recipe amount for best hue .
5.3 Incorrect Oven Temperature
If the oven is too hot or too cold , the cake wont rise or bake right . Always preheat and use a thermometer if you can .
6. Frequently Asked Questions (FAQs)
6.1 Why is my red velvet cake not red?
Your cake might turn brown if you used Dutch-process cocoa or skipped on coloring . Use natural cocoa powder and enough food dye .
6.2 Can I use cocoa powder instead of chocolate?
Cocoa powder is better here since it gives the light cocoa taste you want . Chocolate can make it too sweet or change the texture .
6.3 How should I store red velvet cake?
Store in an airtight container in the fridge for up to a week . Let it rest at room temp before eating for the best taste .
6.4 Can I make red velvet cake ahead of time?
Yes , bake the layers in advance and wrap them tight in plastic wrap . Keep in fridge or freezer till ready to frost .
Conclusion
Red velvet саke is more than just dessert , its a tradition that brings people together . Its bold look and special taste make it a top pick for many celebrations . Now you have the steps and tips to bake your own red velvet cake for any party or just for fun !
red velvet cake
Equipment
- 2 round cake pans (9 inches)
- 1 mixing bowls
- 1 electric mixer or whisk
- 1 rubber spatula
- 1 measuring cups and spoons
- 1 sifter
- 1 cooling rack
Ingredients
- 2.5 cups all-purpose flour
- 1.5 cups granulated sugar
- 1 teaspoon baking soda
- 1 teaspoon salt
- 1 teaspoon cocoa powder
- 1.5 cups vegetable oil
- 1 cup buttermilk, room temperature
- 2 large eggs
- 2 tablespoons red food coloring
- 1 teaspoon vanilla extract
- 1 teaspoon white vinegar
- 8 oz cream cheese, softened
- 0.5 cup unsalted butter, softened
- 4 cups powdered sugar
- 1 teaspoon vanilla extract
- 2-4 tablespoons milk (for consistency)
Instructions
- Preheat your oven to 350°F (175°C). Grease and flour the two round cake pans.
- In a mixing bowl, sift together the flour, baking soda, salt, and cocoa powder. Set aside.
- In another bowl, mix the vegetable oil and granulated sugar until well combined. Add the buttermilk, eggs, red food coloring, vanilla extract, and white vinegar. Mix until smooth.
- Gradually add the dry ingredients to the wet ingredients, mixing on low speed until fully incorporated. Be careful not to overmix.
- Divide the batter evenly between the two prepared cake pans.
- Bake in the preheated oven for 25-30 minutes, or until a toothpick inserted into the center comes out clean.
- Allow the cakes to cool in the pans for about 10 minutes, then transfer them to a cooling rack to cool completely.
- While the cakes are cooling, prepare the cream cheese frosting. In a large bowl, beat the softened cream cheese and unsalted butter together until smooth.
- Gradually add in the powdered sugar and vanilla extract, mixing until well combined. If the frosting is too thick, add milk a tablespoon at a time until desired consistency is reached.
- Once the cakes are completely cool, place one layer on a serving plate. Spread a layer of cream cheese frosting on top. Place the second layer on top and frost the top and sides of the cake with the remaining frosting.
- Decorate as desired, and slice to serve.