People have been baking sourdough bread for ages , and lately it’s gotten super popular with home cooks and food fans alike . This bread uses natural fermentation to give it that tangy taste , chewy inside and a thick crisp crust . As more folks try out baking , sourdough is often the go-to loaf to mess around with flavors and skills .
One big step in making sourdough is scoring – that’s when you make shallow cuts on top of the dough before it goes in the oven . Scoring does more than look fancy ; it helps the bread expand the way you want , and it can make neat patterns that show off your style . How you slice the dough can change the crust and the way the inside crumb looks , so it’s a key part of baking .
This article will dig into different scoring patterns for sourdough , why they matter and how they change your loaf . From easy designs to tricky art , you’ll learn tips to up your bread game and make each loaf your own .
Understanding Sourdоugh Bread
What is Sourdough Bread?
Sourdough bread is a loaf made with wild yeast and friendly bacteria that live in flour and water . Instead of using store‐bought yeast , you keep a starter alive that bubbles up and makes the dough rise . The result is a loaf with a tangy flavor , a soft chewy bit inside and a crust that can be crunchy or crackly . Longer ferment times also bring out more taste than quick breads do .
Unlike breads made fast with instant yeast , sourdough needs patience and attention . Every loaf shows where you bake it and how you treat it , so each one can taste a bit different .
The Science Behind Sourdough
Inside the sourdough starter live wild yeast and lactobacilli bacteria working together . The yeast makes carbon dioxide bubbles that puff up the dough , while the bacteria makes lactic acid for that sour kick . This mix gives the bread its flavor and texture .
Also , the acids made during a long rise help keep bad bacteria away , so sourdough can stay fresh a bit longer than normal white bread . Knowing this science helps you tweak things like time and temperature to get the loaf you want .

Importance of Scoring Patterns
What is Scoring?
Scoring means slicing the dough’s top right before it bakes . This does three big things : it lets the dough expand in a controlled way , it adds a nice look to the loaf , and it can change how the crust and crumb turn out .
How Scoring Affects the Final Loaf
If you score correctly , you’ll get an even oven spring that makes a soft inside with open holes and a crisp crust outside . Plus , the shapes you cut in the dough turn into cool patterns that make your loaf look pro .
Common Sourdough Scoring Patterns
Basic Patterns
- Single Slash
A simple diagonal cut across the dough . Easy and classic , it lets the bread open up in one neat line .
Tip: Use a sharp lame and slice with a quick confident motion at about 30° to 45° .
- Cross Hatches
Make parallel cuts one way , then cross them with cuts the other way for a grid effect . It helps the loaf rise more evenly .
Tip: Light pressure for each cut , don’t press too deep or you’ll flatten the dough .
Advanced Patterns
- Wheat Sheaf
Looks like a bundle of wheat stalks . It’s decorative and a bit more work .
Tip: Start with a straight cut in the middle , then add angled slashes all around like spokes .
- Starburst
Several cuts radiating from the center look like a star . It gives a nice oven spring and a showy top .
Tip: Cut deeper in the center , shallower as you go out , for the best burst effect .
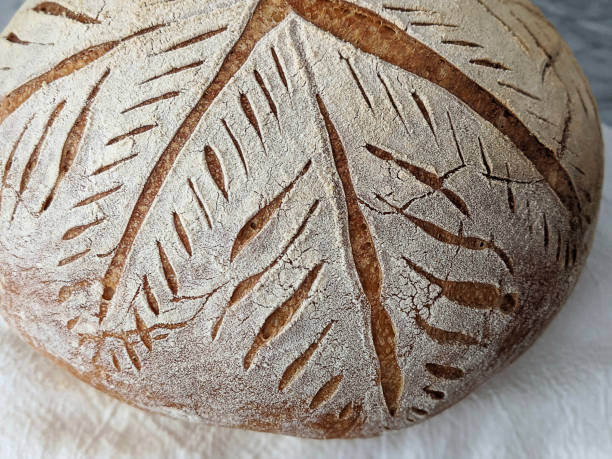
- Leaf Pattern
Carve curved lines to mimic a leaf shape . Great for breads you want to gift or sell .
Tip: Keep your hand light on the blade and make smooth curves .
- Rope Twist
Parallel cuts that you then twist slightly so they look like a rope braid . Pretty unique .
Tip: Keep cuts even and then gently twist the dough before baking .
Tools and Techniques for Scoring
Tools You Need
- Lame – A small bread knife made for sharp clean cuts .
- Razor blade – Thin and super sharp for detailed patterns .
- Template – A paper guide some bakers use to keep designs consistent .
Techniques for Perfect Scoring
- Blade grip: Hold it steady but don’t squeeze too hard or you’ll lose control .
- Cut angle: Aim for around 30° to 45° so the dough can bloom up right .
- Timing: Score just as you’re about to put the loaf in the oven , when the dough is fully proofed .
A Simple Sourdоugh Recipe
Ingredients
- 3 cups all-purpose flour
- 1 ½ cups water
- 1 teaspoon salt
- 1 cup active sourdough starter
- Optional: seeds or herbs for extra flavor
Directions
- Feed Starter: Mix equal flour and water , let it get bubbly and double in size .
- Mix Dough: Stir flour and water till no dry bits remain , rest 30 min (autolyse) .
- First Rise: Add starter and salt , mix well , cover and let rise 4–6 hours till puffy .
- Shape Dough: Turn onto floured surface , form a round or oval and create surface tension .
- Proof: Put dough in floured basket , cover and proof 2–4 hours till puffed .
- Score: Right before baking , slash your pattern quickly and confidently .
- Bake: Heat oven to 450°F (232°C) with Dutch oven inside . Transfer dough , cover and bake 30 min , then uncover and bake 15–20 more min .
- Cool: Let loaf cool on wire rack before slicing to keep crust crisp .
Expert Tips
- Don’t overproof or dough can collapse in oven .
- Try different water amounts to see what crumb you like best .
- Note everything in a journal so you learn what works each time .
FAQs about Scoring Patterns
- Why is scoring important? It controls how the loaf opens , makes it look nice and affects crust/crumb .
- Best tool for scoring? A lame or a razor blade gives the cleanest cuts .
- Can you over-score? Yes , too many cuts or too deep ones weaken the dough spring .
- When to score? When dough is fully proofed , puffy but not too flat .
- Easy patterns for starters? Single slash or cross hatches are best for beginners .
Conclusion
Learning scoring patterns can really up your baking game . Play with different designs , see how they change your loaf and have fun making each sourdough unique . Share your patterns with friends or online to inspire others and keep improving your bread skills .

sourdough bread scoring patterns
Equipment
- 1 large mixing bowl
- 1 kitchen scale
- 1 dough scraper
- 2 banneton or proofing basket
- 1 sharp knife or razor blade (lame) for scoring
- 1 baking stone or baking sheet
- 1 Dutch oven (optional)
- 1 food thermometer (optional)
Ingredients
- 500 g bread flour
- 350 g water room temperature
- 100 g active sourdough starter
- 10 g sea salt equivalent to 2 teaspoons
Instructions
- In a large mixing bowl, combine 500g of bread flour and 350g of water. Mix until no dry flour remains, creating a shaggy dough. Let it rest for 30 minutes (autolyse).
- After resting, add 100g of active sourdough starter and 10g of sea salt to the dough. Mix well until fully incorporated.
- Begin the bulk fermentation by covering the bowl with a damp kitchen towel. Let the dough rise at room temperature for about 4-6 hours, performing stretch and folds every 30 minutes for the first 2 hours.
- Once the dough has risen and appears bubbly, gently turn it out onto a lightly floured surface. Divide the dough into two equal portions.
- Shape each portion into a round loaf by folding the edges toward the center. Flip the dough seam side down and shape it by rotating it against the surface to create tension on the outside.
- Place the shaped loaves seam side up in bannetons or proofing baskets. Cover them with a damp cloth and let them proof for 1-2 hours at room temperature, or for a more robust flavor, refrigerate overnight (up to 12 hours).
- Preheat your oven to 450°F (230°C) during the final stages of proofing. If using a Dutch oven, place it in the oven while preheating.
- Once fully proofed, carefully turn the loaves out onto a parchment paper-lined baking sheet or directly onto a piece of parchment if using a Dutch oven.
- Use a sharp knife or razor blade to create your desired scoring patterns on top of the loaves.
- If using a Dutch oven, carefully place the lid on and bake for 30 minutes, then remove the lid and bake for an additional 15-20 minutes until golden brown. If using a baking sheet, bake the loaves for 30 minutes or until golden and hollow-sounding when tapped on the bottom.
- Once baked, remove the loaves from the oven and allow them to cool on a wire rack for at least 1 hour before slicing.